Looking for a crowd-pleasing appetizer that looks fancy but takes less effort than finding your car keys after a party? Meet the Loaded 7-Layer Taco Dip Cups. These little flavor towers are creamy, spicy, crunchy, and delightfully customizable.
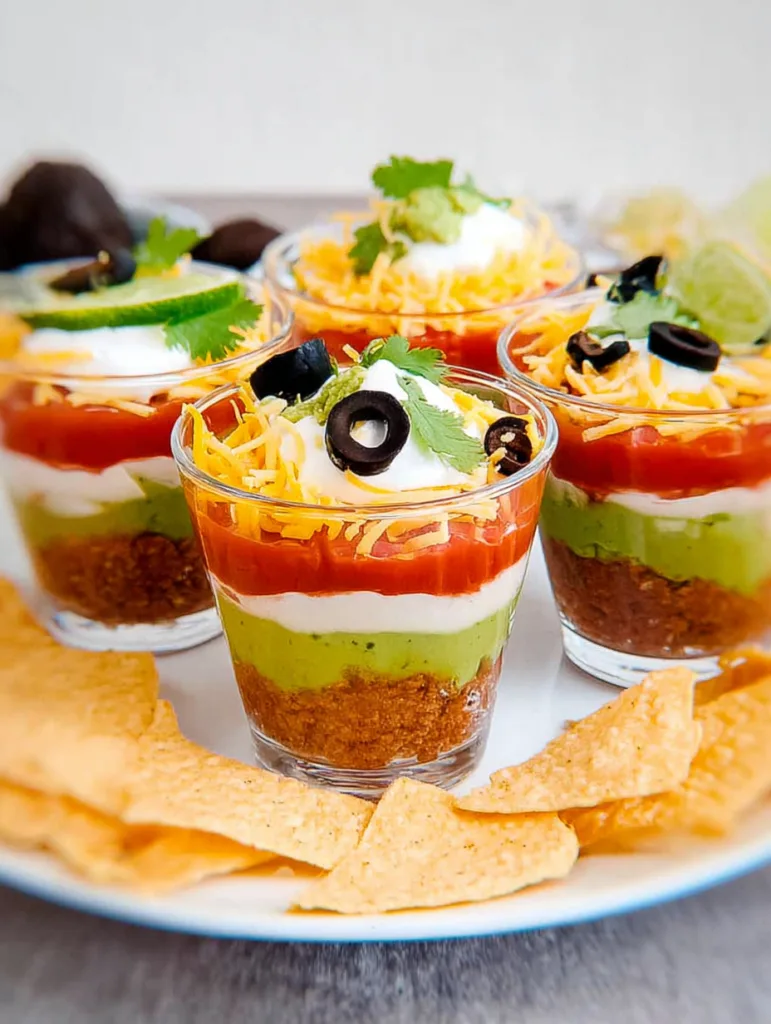
Each layer adds personality – from smooth beans to cool guacamole – all stacked up in a tidy, single-serve cup that guarantees no double-dipping drama. They’re the kind of snack that makes everyone believe you’re the host who “just has it together.”
Before you even set them down, your guests will already be hovering nearby, chips in hand, ready to scoop into that perfect mix of layers. In this article, you’ll get the easy step-by-step recipe, pro tips for layering like a culinary architect, serving ideas for every occasion, and a few creative twists that make these cups shine brighter than the snack table spotlight.
Why These Taco Dip Cups Are a Hit
If you’ve ever tried balancing a plate of nachos while mingling, you already know the value of food that fits in one hand. These 7-Layer Taco Dip Cups are designed for just that – easy to grab, mess-free, and full of flavor in every bite.
Here’s why everyone loves them:
- Convenience: Individual portions mean no crowding around one bowl.
- Flavor balance: Each spoonful gets a hit of creamy, spicy, and fresh notes.
- Make-ahead friendly: They chill beautifully and taste even better when the flavors mingle.
- Visual appeal: Layers look stunning in clear cups.
- Customizable: Adjust the spice, toppings, or cheese to your liking.
Whether it’s a family barbecue, a football party, or a quick snack night, these dip cups hit the sweet spot of simple prep and satisfying taste. They pair wonderfully with tortilla chips, veggie sticks, or even baked pita for a fun twist.
Recipe
Print
Loaded 7-Layer Taco Dip Cups
- Total Time: 22 minutes
- Yield: 8 servings 1x
- Diet: Vegetarian
Description
Creamy, spicy, and irresistibly layered — these Loaded 7-Layer Taco Dip Cups are the perfect grab-and-go appetizer for parties, picnics, or any celebration.
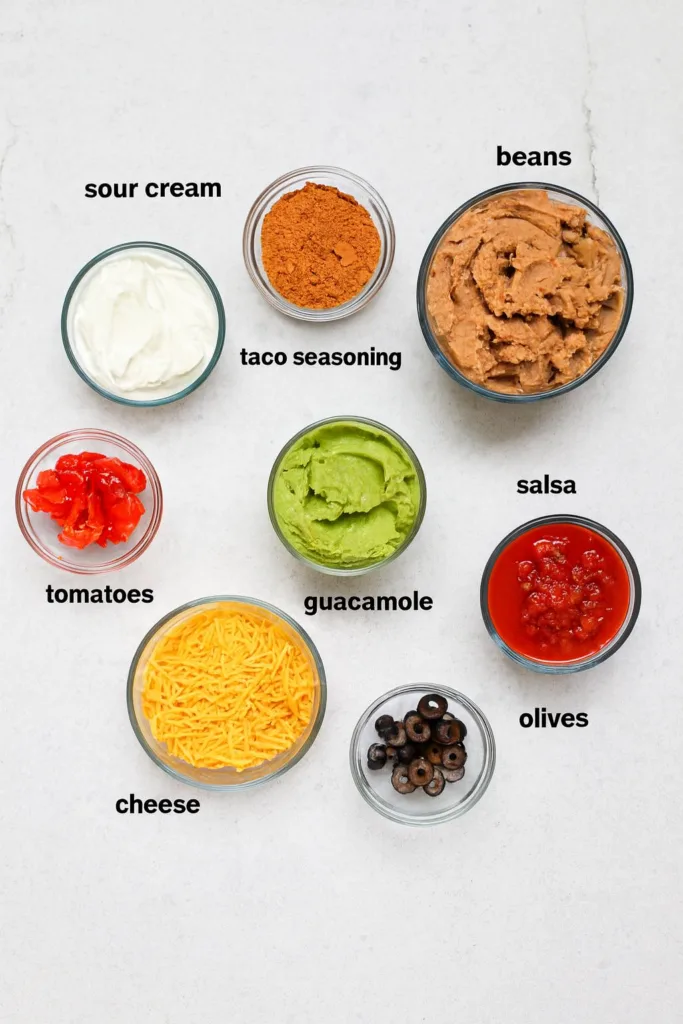
Ingredients
- 1 can refried beans (425 g)
- 1 package taco seasoning (30 g)
- 1 cup guacamole (240 g)
- 8 oz Greek yogurt (225 g)
- 1 cup salsa (240 g)
- 1 cup shredded cheddar cheese (120 g)
- 2 Roma tomatoes, diced (120 g)
- 2 tablespoons sliced black olives (30 g)
- Cilantro, for garnish (5 g)
- Tortilla chips, for serving
Instructions
- Mix taco seasoning with refried beans in a small bowl until smooth.
- Spoon about 2 tablespoons of each layer into clear plastic cups.
- Layer the beans first.
- Add a layer of guacamole.
- Spread a layer of Greek yogurt.
- Spoon over the salsa.
- Sprinkle cheddar cheese on top.
- Add diced tomatoes.
- Finish with sliced black olives.
- Garnish lightly with cilantro.
- Keep chilled until ready to serve.
Notes
- Keep the cups refrigerated until serving.
- You can prepare them a few hours in advance for best flavor blending.
- Prep Time: 20 minutes
- Cook Time: 2 minutes
- Category: Appetizer
- Method: Layering
- Cuisine: American, Mexican
Nutrition
- Serving Size: 1 cup
- Calories: 205
- Sugar: 4 g
- Sodium: 850 mg
- Fat: 15 g
- Saturated Fat: 6 g
- Unsaturated Fat: 6 g
- Trans Fat: 0 g
- Carbohydrates: 13 g
- Fiber: 5 g
- Protein: 7 g
- Cholesterol: 31 mg
Layering Like a Pro
The Secret to Perfect Layers
The art of the 7-layer dip cup is in the balance. You want each scoop to have the right ratio – creamy, spicy, and crunchy. Start with sturdy ingredients like the seasoned beans; they form the foundation that holds everything else together. Then move upward with guacamole and yogurt, finishing with the lighter layers like salsa, cheese, and tomatoes.
A clear cup works wonders here because it lets those colorful layers show off. Use about two tablespoons of each layer to keep proportions even. If you’re making this for a crowd, consider using small jars instead of cups; they seal easily and make transport a breeze.
Choosing the Right Ingredients
Each layer contributes something distinct:
- Refried beans bring warmth and a hearty base.
- Guacamole adds creamy texture and freshness.
- Greek yogurt brings a tangy note and a smooth finish.
- Salsa adds a mild kick and moisture.
- Cheddar provides richness and that satisfying cheese pull.
- Tomatoes and olives add brightness and contrast.
Keep ingredients chilled until assembly to preserve freshness.
For another crowd favorite with similar party energy, try the Kid-Friendly Taco Casserole – it’s just as fun but served warm.
Serving and Presentation Tips
Make It Party-Perfect
Presentation can turn a simple dip into the talk of the table. Use clear plastic cups or small glass jars so your guests can admire the colorful layers. Arrange them on a large tray surrounded by tortilla chips, and consider labeling the tray with small tags like “Grab & Dip!” to add a playful touch.
Want a little variety? Set up a “Build Your Own Dip Cup” station. Provide bowls of each layer, and let everyone stack their cups however they like. It’s a simple way to make guests feel like part of the fun.
Keeping It Fresh
The best part of this appetizer is its freshness. If making ahead, cover each cup tightly with plastic wrap or lids and refrigerate. Don’t add toppings like cilantro until just before serving to keep them vibrant.
If you want a companion dish that matches the spice and crunch of these dip cups, check out the Crispy Baked Jalapeño Poppers. They’re another party hit with a similar flavor vibe.
Fun Variations and Expert Tips
Creative Layer Twists
Once you’ve nailed the basics, have fun experimenting:
- Swap the cheddar for Monterey Jack for a milder flavor.
- Mix Greek yogurt with lime juice and a pinch of cumin for a tangy twist.
- Add diced bell peppers or corn between layers for color and crunch.
- For extra protein, include a layer of seasoned lentils or black beans.
These tweaks keep the recipe interesting and let you adapt it for different tastes.
Smart Hosting Hacks
If you’re serving outdoors, store the dip cups on a tray of crushed ice to keep them cool. They’ll hold up for hours without losing their creamy consistency. Always bring extra chips – trust me, people eat more than they think they will.
For other mini bites that complement this appetizer, the Buffalo Chicken Wonton Cups bring the same bold flavors in a crisp, baked form.
FAQ
Can I make these dip cups a day ahead?
Yes, you can make them up to 24 hours in advance. Just cover tightly and keep them refrigerated until serving.
What’s the best way to transport them?
Use cups with lids or small jars. Place them in a shallow container with ice packs to keep them cool.
Can I make them dairy-free?
Absolutely. Swap the Greek yogurt and cheese with your preferred dairy-free alternatives.
How long can they sit out during a party?
About two hours at room temperature. After that, refrigerate to keep them safe and fresh.
What can I serve with these dip cups?
Tortilla chips, veggie sticks, pita chips, or even baked crackers work great.
Final Thoughts
Loaded 7-Layer Taco Dip Cups are the kind of appetizer that guarantees an empty tray at every gathering. They’re creamy, zesty, and satisfying without the stress of complicated prep. With layers that celebrate texture and flavor in every scoop, they prove that small servings can still deliver big satisfaction.
Whether it’s game night, a backyard barbecue, or a quick snack fix, these cups fit right in. Once you’ve made them, you’ll wonder why you ever shared one big bowl before.