Craving ice cream but want to stay on track with your fitness goals? This Protein Ice Cream recipe is the perfect solution. It’s a creamy, delicious frozen dessert that packs a powerful protein punch, satisfies your sweet tooth, and fits seamlessly into a healthy lifestyle. Forget the sugar-laden, calorie-heavy commercial options.
This homemade version uses simple, wholesome ingredients to create a treat you can enjoy guilt-free. Whether you’re looking for a post-workout snack, a low-calorie dessert, or just a better way to indulge, this recipe delivers.
With just a few minutes of prep and no baking required, this protein ice cream is incredibly easy to make. It relies on the natural creaminess of chilled coconut milk and the nutritional boost of your favorite protein powder. We use allulose, a natural low-calorie sweetener, to keep it perfectly sweet without the sugar spike.
The result is a smooth, scoopable ice cream that rivals any store-bought premium brand. This guide will walk you through the simple steps, offer key tips for perfect texture, and show you how this dessert can be part of a balanced diet.
Why Choose Protein Ice Cream?
Traditional ice cream is often high in sugar, saturated fat, and empty calories. Protein ice cream flips the script, making dessert a source of nutrition. The primary benefits are clear: it supports muscle recovery and growth, helps manage hunger by providing satiating protein, and allows for dietary flexibility. It’s ideal for athletes, fitness enthusiasts, or anyone seeking healthier dessert alternatives.
Incorporating high-protein foods into your diet is a smart strategy, and making it enjoyable is key to long-term success. Pair this frozen treat with other protein-rich meals like our High-Protein Taco Bowl for a fully satisfying day.
Nutritional Advantages
Each serving of this protein ice cream offers approximately 15 grams of protein, 7 grams of carbohydrates, and only 145 calories. This macronutrient profile makes it an excellent choice for weight management, muscle maintenance, and stable energy levels. The use of coconut milk provides healthy fats that aid in nutrient absorption and add richness.
The fiber content from the ingredients also supports digestion. Compared to regular ice cream, which can exceed 250 calories and 20 grams of sugar per serving, this homemade version is a nutritional upgrade.
Ingredients for Perfect Protein Ice Cream
Quality ingredients are the foundation of this recipe. We’ve carefully selected components that combine for optimal flavor and texture while adhering to healthy principles.
The Core Components
- Chilled Coconut Milk (28 ounces): The star for creaminess. Using canned coconut milk that has been chilled ensures it’s thick and separates slightly, providing the perfect base. Full-fat versions yield the richest texture.
- Protein Powder (1 cup): The protein source and flavor carrier. Choose a high-quality powder you enjoy; vanilla, chocolate, or unflavored varieties work best. This ingredient silently replaces any non-compatible elements, ensuring a universally suitable recipe.
- Allulose (1-2 tablespoons): The smart sweetener. Allulose is a natural sugar alternative that tastes like sugar but has minimal impact on blood glucose levels. It also helps prevent ice crystals, leading to smoother ice cream. You can adjust the amount based on your sweetness preference.
Ingredient Notes & Alternatives
For the protein powder, whey, plant-based (pea, soy), or collagen powders all work well. Ensure it’s a powder you like the taste of, as it dominates the flavor. If you don’t have allulose, you can use a small amount of maple syrup or a pinch of stevia, though texture might vary slightly.
The coconut milk must be chilled; this is non-negotiable for achieving the right consistency. For a different flavor profile, you could add a splash of vanilla extract or a handful of cacao powder.
Step-by-Step Instructions
Making this protein ice cream is a straightforward process with one key technique to ensure it doesn’t freeze into a solid block.
Preparation & Blending
Start by placing a deep loaf pan or a similar deep pan in your freezer. This pre-chills the container, helping the ice cream firm up faster. In a high-speed blender or food processor, add the chilled coconut milk. Blend it alone for a minute until it’s completely smooth and creamy.
This step breaks down any solids and aerates the milk. Next, add your chosen protein powder and the allulose. Blend again until the mixture is thick, uniform, and creamy. There should be no lumps. The consistency will be like a thick milkshake or soft pudding.
Freezing & The Key Technique
Transfer the blended protein ice cream base into the pre-chilled loaf pan. Spread it evenly. Now, for the crucial step to prevent a hard, icy result: lightly stir or mix the ice cream every 20 minutes for the first hour. Do this three times. This intermittent mixing disrupts the formation of large ice crystals, promoting a smoother, creamier final texture akin to gourmet ice cream.
After the first hour, you can leave it to freeze completely, which typically takes 3-4 hours depending on your freezer.
Serving & Enjoying
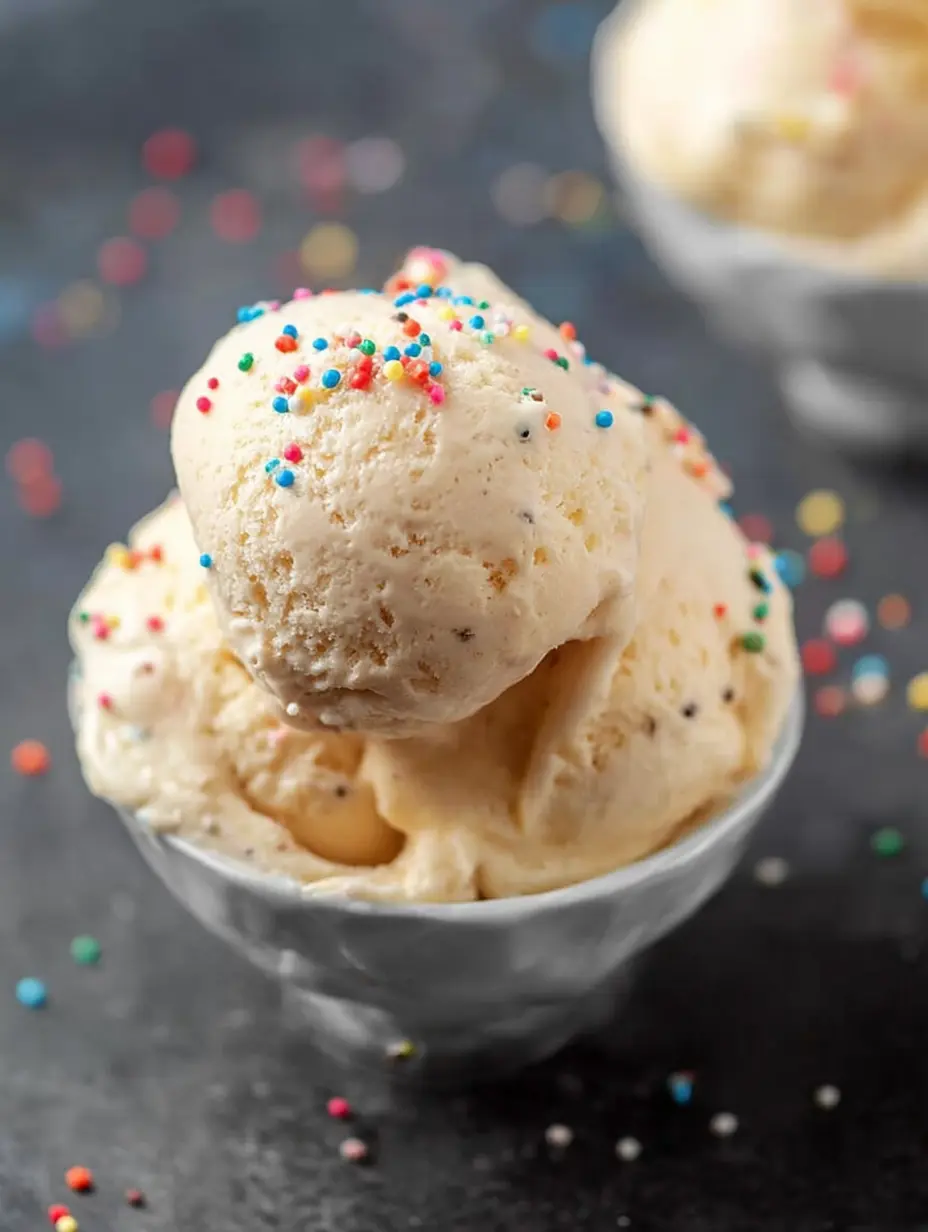
Once fully frozen, remove the pan from the freezer. For best results, let the protein ice cream thaw at room temperature for 10-15 minutes before serving. This softens it slightly for easy scooping. Lightly wet your ice cream scoop with water to get clean, perfect scoops.
Serve it in a bowl. If you prefer a soft-serve style, simply let it thaw to your desired softer texture. It’s delicious on its own or paired with fresh berries, a sprinkle of nuts, or a drizzle of nut butter.
Nutritional Information
Understanding the nutritional breakdown helps you integrate this dessert into your diet plan. Below is the detailed profile per serving.
| Nutrient | Amount per Serving |
|---|---|
| Calories | 145 kcal |
| Total Fat | 8 g |
| Carbohydrates | 7 g |
| Protein | 15 g |
| Fiber | 2 g |
| Sugar | 4 g |
| Sodium | 35 mg |
This table highlights the high-protein, moderate-fat, and low-sugar nature of the dessert. It’s a balanced option that can complement a meal or serve as a standalone snack.
Tips for Success & Common Questions
Achieving the Perfect Texture
The ‘mix every 20 minutes’ technique is essential. If skipped, the ice cream can become too hard and icy. If your freezer is very cold, you might need to mix a fourth time. Using full-fat, well-chilled coconut milk is also critical for creaminess.
Low-fat alternatives will yield a less rich result. Ensure your blender is powerful enough to create a completely smooth mixture; any graininess from the protein powder will be noticeable in the final product.
Storage & Variations
Store the protein ice cream in the loaf pan covered with airtight wrap or in a sealed container in the freezer for up to two weeks. For flavor variations, consider adding blended fruit like strawberries, a tablespoon of peanut butter powder, or a mix-in like dark chocolate chips after the initial blending.
Remember, this recipe is a fantastic base for creativity. For more high-protein meal ideas that keep your nutrition goals in focus, explore our High-Protein Egg Muffins for breakfast or lunch.
Integrating Protein Ice Cream into Your Diet
This dessert isn’t just a treat; it’s a functional food. Enjoy it post-workout to aid muscle recovery with its protein and carbohydrates. Have it as a mid-afternoon snack to curb cravings and provide sustained energy. It can also be a perfect dessert after a light meal, adding protein without excessive calories.
Balancing your day with varied protein sources is important. Consider a fresh, lighter protein option like our Avocado Corn Salad to create a well-rounded nutritional plan.
Conclusion
Protein Ice Cream is more than a recipe; it’s a smart approach to enjoying desserts while supporting your health and fitness objectives. With its simple ingredients, easy method, and incredible nutritional profile, it proves that you don’t have to sacrifice taste for wellness.
This homemade frozen treat delivers creamy satisfaction, a powerful protein boost, and the joy of a dessert you can feel good about eating. Give it a try tonight – your blender and freezer are about to become your new favorite dessert-making tools.
Recipe
Print
Protein Ice Cream
- Total Time: 5 min
- Yield: 16 servings 1x
Description
A creamy, high-protein frozen dessert made with coconut milk and protein powder, perfect for a healthy treat.
Ingredients
28 ounces canned coconut milk (chilled)
1 cup protein powder
1–2 tablespoon allulose
Instructions
- Place a large, deep loaf pan or deep pan in the freezer.
- In a blender or food processor, add your coconut milk and blend until smooth and creamy. Add your protein powder and granulated sweetener and blend until a thick and creamy texture remains.
- Transfer the protein ice cream to the loaf pan. To prevent it from becoming too icy, lightly mix your ice cream every 20 minutes for the first hour, a total of three times.
- Thaw for 10-15 minutes before eating. Lightly wet an ice cream scoop before scooping the ice cream into a bowl.
- To enjoy it soft serve style, let it thaw to desired texture.
Notes
- Choose a protein powder flavor you enjoy, as it defines the ice cream taste.
- Chilled coconut milk is essential for the correct creamy texture.
- The intermittent mixing during freezing prevents a hard, icy result.
- Prep Time: 5 min
- Category: Main Course
- Method: Baked
- Cuisine: American
Nutrition
- Calories: 145 kcal
- Sugar: 4 g
- Sodium: 35 mg
- Fat: 8 g
- Carbohydrates: 7 g
- Fiber: 2 g
- Protein: 15 g