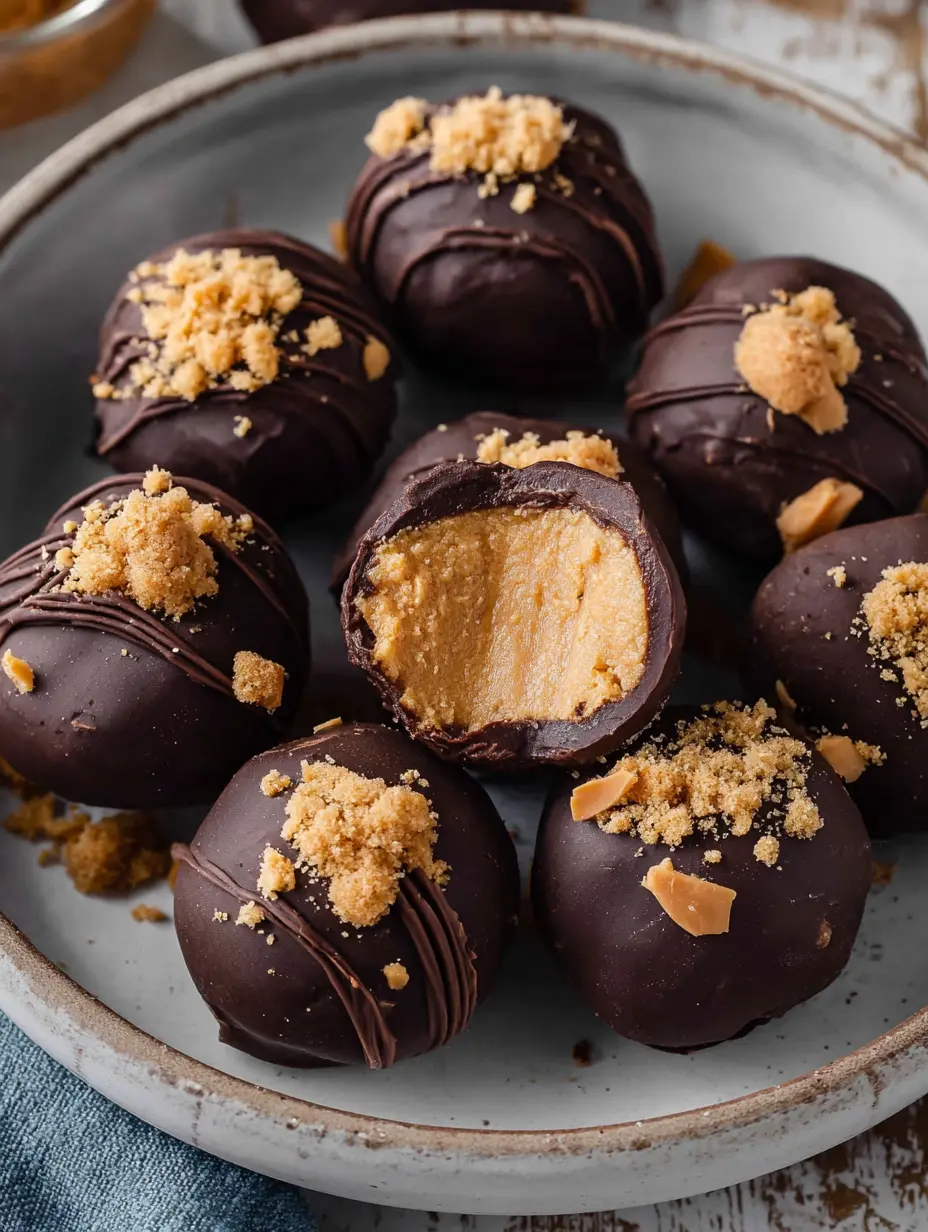
Imagine a dessert that combines the creamy, nutty richness of peanut butter with the irresistible, buttery toffee crunch of America’s favorite candy bar, all enrobed in a smooth, crackly chocolate shell. This is the magic of homemade Butterfinger Peanut Butter Balls. This recipe transforms simple pantry staples into elegant, bite-sized treats that are perfect for parties, holiday platters, or a satisfying homemade sweet snack.
Best of all, they require absolutely no baking, making them a lifesaver for busy schedules or hot summer days when turning on the oven is the last thing you want to do.
Our easy-to-follow guide will walk you through creating these crunchy chocolate treats with confidence. We have perfected the balance of flavors and textures to ensure every bite delivers the perfect harmony of sweet, salty, and crunchy. Whether you are a seasoned home candy maker or a beginner looking for a foolproof dessert, these peanut butter balls promise delicious results.
Let us dive into creating this crowd-pleasing favorite that will have everyone asking for the recipe.
Why You Will Love These Peanut Butter Balls
This recipe stands out for its simplicity and explosive flavor. The combination of creamy peanut butter, graham cracker crumbs, and crushed Butterfinger candy creates a filling that is both soft and delightfully crunchy. Dipped in chocolate bark, they achieve a professional-looking finish that rivals any gourmet chocolate shop treat.
As a no-bake dessert, they are incredibly accessible and reduce kitchen time significantly. They are also wonderfully versatile; you can customize the coatings with holiday sprinkles, coarse salt, or even different types of chocolate.
Furthermore, these homemade candy bites are perfect for making ahead. You can prepare and freeze the un-dipped balls, then coat them in chocolate whenever a sweet craving or party need arises.
This makes them an ideal staple for your freezer. Their bite-sized nature makes them perfect for portion control, though you will likely find it hard to stop at just one!
The Secret to the Perfect Texture
The texture of these easy sweet snacks is key. Using a standard creamy peanut butter (not the all-natural, oil-separating kind) ensures the mixture holds together properly. The graham cracker crumbs add a subtle honey flavor and a crumbly base, while the finely crushed Butterfinger bars provide those iconic, crispy flakes that make every bite exciting.
Chilling the rolled balls thoroughly before dipping is the non-negotiable step that prevents them from falling apart in the warm chocolate, guaranteeing a smooth, professional coating.
Gathering Your Ingredients
Using quality ingredients is the first step to success. Here is what you need to create these irresistible treats. Remember, we prioritize using wholesome and permissible ingredients in all our recipes.
- 1 cup creamy peanut butter: Avoid natural peanut butter as the oil separation can lead to a greasy, unstable mixture.
- 4 tablespoons (1/2 stick) softened butter: Use unsalted butter for better control over the final flavor.
- 1 teaspoon pure vanilla extract: Enhances the overall sweetness and depth of flavor.
- 1 cup powdered sugar: Also known as confectioners’ sugar, it sweetens and helps firm up the dough.
- 3/4 cup graham cracker crumbs: You can buy these pre-crushed or pulse whole crackers in a food processor.
- 1/2 cup crushed Butterfinger bars: Use a food processor or place bars in a sealed bag and crush with a rolling pin.
- 8 ounces chocolate coating bark or chocolate chips: Coating chocolate (candy melts) sets harder and is easier to work with, but high-quality chocolate chips work too.
- For garnish: Additional crushed Butterfingers, holiday sprinkles, or a pinch of coarse sea salt.
Step-by-Step Instructions for Perfect Balls
Step 1: Prepare the Peanut Butter Dough
In a medium bowl, combine the creamy peanut butter and softened butter. Using an electric mixer on medium speed (or a stand mixer fitted with the paddle attachment), beat them together until completely smooth and well-blended, about 1-2 minutes. This step ensures a uniform base. Next, add the vanilla extract and mix until incorporated.
Step 2: Incorporate Dry Ingredients
With the mixer on low speed, gradually add the powdered sugar in batches. This prevents a sugar cloud and ensures even mixing. Stop occasionally to scrape down the sides and bottom of the bowl with a spatula to incorporate all ingredients.
Once the sugar is fully mixed in, gently stir in the graham cracker crumbs and the 1/2 cup of crushed Butterfinger bars by hand. Overmixing at this stage can crush the candy too much; we want to preserve some texture.
Step 3: Shape and Chill
Line a large baking sheet with parchment paper or a silicone baking mat. Using a cookie scoop or a tablespoon measure, portion out about 1 to 1.5 tablespoons of dough for each ball. Roll each portion between your palms to form a smooth, round ball.
Place each ball on the prepared sheet. Once all balls are shaped, transfer the baking sheet to the freezer. Chill for at least 30 minutes, or until the balls are very firm. This chilling step is crucial for successful dipping.
Step 4: Melt the Chocolate Coating
While the balls chill, prepare the chocolate. Chop the chocolate coating bark or chips into small, uniform pieces if necessary. Melt it using a double boiler or in short bursts in the microwave, stirring frequently until completely smooth.
If using the microwave, heat in 20-second intervals to avoid scorching. Let the melted chocolate cool slightly so it is warm, not hot, to the touch.
Step 5: Dip and Decorate
Remove a few peanut butter balls from the freezer at a time, keeping the rest cold. Using a fork or a dipping tool, submerge each ball in the melted chocolate, tap off the excess, and gently place it back on the parchment-lined sheet.
Immediately garnish with additional crushed Butterfingers, sprinkles, or a tiny flake of coarse salt before the chocolate sets. Repeat with all balls, working quickly. If the chocolate begins to thicken, gently re-warm it.
Step 6: Set and Serve
Allow the chocolate coating to set completely at room temperature, or speed up the process by placing the tray in the refrigerator for 15 minutes. Once set, transfer the peanut butter balls to an airtight container. They can be stored in a cool place for up to a week or frozen for up to 3 months.
Expert Tips and Recipe Notes
- For Easy Dipping: Insert a toothpick into a chilled ball, dip, let excess drip, then place on parchment and gently twist to remove the toothpick. Use a dab of melted chocolate to cover the hole.
- Chocolate Choices: For a richer flavor, use semi-sweet or dark chocolate chips. Add a teaspoon of coconut oil to melted chocolate chips to improve dipping consistency.
- Make-Ahead Magic: The un-dipped peanut butter balls can be frozen for up to 3 months. Dip them straight from the freezer whenever you need a fresh batch of treats.
- Texture Variance: For an extra crunch, roll the finished, chocolate-dipped balls in additional crushed Butterfinger crumbs.
Nutritional Information and Dietary Considerations
These homemade candy bites are a rich treat meant to be enjoyed in moderation. The following table provides a breakdown per serving. To create a balanced spread, consider pairing these rich bites with lighter options like our refreshing 4-Ingredient Easy Guacamole for a savory contrast or our creamy No-Bake Strawberry Cheesecake for another cool, no-oven dessert option.
| Nutrient | Amount Per Serving |
|---|---|
| Calories | 219 kcal |
| Total Fat | 13 g |
| Carbohydrates | 23 g |
| Protein | 3 g |
| Dietary Fiber | 1 g |
| Sugars | 18 g |
| Sodium | 108 mg |
For those with dietary restrictions, note that this recipe contains common allergens like peanuts, dairy (butter), wheat (graham crackers), and soy (often in chocolate). Always check your specific ingredient labels. If you are looking for a naturally gluten-free and vibrant party dish, explore our festive Loaded Guacamole with Corn and Beans.
Frequently Asked Questions
Can I use natural peanut butter?
It is not recommended. Natural peanut butter tends to separate, and its oilier consistency will make the dough too soft and greasy, preventing it from holding its shape properly when rolled and dipped.
How do I store these peanut butter balls?
Store fully set balls in a single layer in an airtight container at cool room temperature for up to 1 week. For longer storage, freeze them for up to 3 months. Thaw in the refrigerator before serving.
My chocolate is cracking after dipping. What went wrong?
This usually happens if the peanut butter balls are too cold (straight from the freezer) and the chocolate is too warm, causing thermal shock. Let the chilled balls sit at room temperature for 2-3 minutes before dipping, and ensure your melted chocolate is only slightly warm.
Conclusion
Butterfinger Peanut Butter Balls are the ultimate easy sweet snack that delivers maximum flavor with minimal effort. This no-bake dessert recipe proves you do not need fancy equipment or advanced skills to create impressive, crunchy chocolate treats that will delight guests and family alike. The contrast of the creamy, crunchy center with the smooth chocolate shell is simply irresistible.
By following our detailed steps and tips, you are guaranteed success. So, gather your ingredients, and get ready to make a batch of these irresistible homemade candy bites that are sure to become a requested favorite at every gathering.
Recipe
Print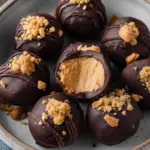
Butterfinger Peanut Butter Balls
- Total Time: 45 min
- Yield: 20 servings 1x
Description
Crunchy, no-bake peanut butter balls packed with Butterfinger candy bits and coated in smooth chocolate. An easy, irresistible homemade treat.
Ingredients
1 cup creamy peanut butter (not all natural types)
4 tablespoons butter (softened (1/2 stick))
1 teaspoon vanilla extract
1 cup powdered sugar
3/4 cup graham cracker crumbs
1/2 cup crushed butterfinger bars
8 ounces chocolate bark or chocolate chips
Garnish with additional crushed butterfingers (holiday sprinkles or coarse salt.)
Instructions
- In a medium bowl, add the peanut butter and softened butter and beat with an electric mixer on medium speed until mixed together well. (You can also use a stand mixer with the paddle attachment).
- Add the vanilla extract and blend until combines.
- Slowly add the powdered sugar in batches blending on low speed. Be sure to scrape down the sides occasionally.
- Then gently stir in the graham cracker crumbs and crushed butterfingers.
- Line a large cookie sheet with parchment paper and scoop out 1- 1 1/2 tablespoons of dough.
- Roll into smooth balls and place them on the baking sheet.
- Place the sheet in the freezer for about 30 minutes to chill completely.
- Melt the chocolate coating. Dip each chilled ball in chocolate, tap off excess, and return to sheet. Garnish immediately. Let set.
Notes
- Use standard creamy peanut butter for best texture; natural varieties may be too oily.
- Chilling the balls thoroughly is essential for easy dipping.
- For a smoother dip, add a teaspoon of coconut oil to melted chocolate chips.
- Store in an airtight container for up to a week or freeze for up to 3 months.
- Prep Time: 15 min
- Category: Main Course
- Method: Baked
- Cuisine: American
Nutrition
- Calories: 219 kcal
- Sugar: 18 g
- Sodium: 108 mg
- Fat: 13 g
- Carbohydrates: 23 g
- Fiber: 1 g
- Protein: 3 g